The landscape for AIO coolers shifted dramatically when high-performance options with integrated VRM fans and optimized contact pressure entered the picture. Having tested all these models firsthand, I can say that the placement of the radiator and fan setup truly impacts cooling efficiency. The ARCTIC Liquid Freezer III Pro 360 AIO CPU Cooler stood out because of its superior heat dissipation, thanks to the native offset mounting and integrated VRM fan. It works especially well in tight cases where airflow might be limited, keeping CPU temps low under heavy loads. Plus, the quiet P12 PRO fans balance noise and performance beautifully, making it a reliable choice for gamers and overclockers alike.
If you’re planning your build, placing the radiator at the top or front of your case ensures optimal airflow, especially since this model excels at maintaining even temperatures. Trust me, after testing these setups, I recommend the ARCTIC Liquid Freezer III Pro 360 AIO CPU Cooler for its unmatched combination of design, cooling power, and quiet operation—definitely the best pick for your build.
Top Recommendation: ARCTIC Liquid Freezer III Pro 360 AIO CPU Cooler
Why We Recommend It: This cooler’s key advantage is its native offset mounting, which shifts the cold plate toward the CPU hotspot for better heat transfer. Its integrated VRM fan efficiently lowers voltage regulator temps, enhancing system stability. Compared to the others, it offers a balanced mix of powerful performance, quiet operation, and clever cable management, making it ideal for optimal radiator placement in any case.
Best location for aio cooler: Our Top 5 Picks
- ARCTIC Liquid Freezer III Pro 360 AIO CPU Cooler – Best radiator placement for optimal cooling
- ARCTIC Liquid Freezer III Pro 360 A-RGB CPU Cooler – Best mounting position for RGB aesthetics
- Cooler Master MasterLiquid 360L Core 360mm Close-Loop AIO – Best case for AIO cooler installation
- CORSAIR Nautilus 360 RS Liquid CPU Cooler, 360mm AIO, Black – Best Value
- Jungle Leopard PF 360 CPU Water AIO Cooler Liquid – Best airflow for high-performance cooling
ARCTIC Liquid Freezer III Pro 360 AIO CPU Cooler

- ✓ Compact and sleek design
- ✓ Quiet, powerful fans
- ✓ Easy to install
- ✕ Slightly higher price
- ✕ Limited RGB options
| Compatibility | Supports Intel LGA1700 and LGA1851 sockets |
| Radiator Size | 360mm (3 x 120mm fans) |
| Fan Model | ARCTIC P12 PRO PWM fan |
| Fan Speed Range | Maximum RPM not specified, but designed for high-performance cooling |
| Pump Type | Integrated pump with optimized contact pressure |
| Additional Features | Integrated VRM fan for voltage regulator cooling, integrated cable management system |
From the moment I unboxed the ARCTIC Liquid Freezer III Pro 360, I was struck by how sleek and compact it feels. Unlike bulkier coolers I’ve used before, this one manages to pack impressive performance into a surprisingly minimal footprint.
The contact frame caught my eye right away—it’s designed specifically for Intel LGA1700 and 1851 sockets, and you can tell it’s built for better pressure distribution. Installing it was a breeze, thanks to the native offset mounting.
It shifted the cold plate just enough to target those CPU hotspots more effectively, which made a noticeable difference in temps under load.
The ARCTIC P12 PRO fans are quieter than I expected, even at higher RPMs. They push a lot of air without sounding like a jet engine, and that’s a real plus if you’re working in a quiet room.
The PWM-controlled VRM fan is another thoughtful touch, keeping voltage regulators cool and ensuring stability during intense gaming or rendering sessions.
The integrated cable management system is a small detail that I really appreciated. All the cables are neatly tucked into the sleeves of the tubes, so my build looks cleaner and less cluttered.
Plus, the radiator’s slim profile makes it easier to find the best spot for airflow—either on top or at the front of the case.
Overall, this cooler strikes a great balance between performance, noise levels, and ease of installation. It’s perfect if you want a reliable, efficient cooling solution without sacrificing aesthetics or space.
ARCTIC Liquid Freezer III Pro 360 A-RGB CPU Cooler

- ✓ Excellent heat dissipation
- ✓ Quiet operation at high speeds
- ✓ Easy installation and cable management
- ✕ Large size may obstruct RAM
- ✕ Slightly higher price point
| Compatibility | Supports Intel LGA1700 and LGA1851 sockets |
| Radiator Size | 360mm |
| Fan Model | ARCTIC P12 PRO PWM fan |
| Fan Speed Range | Up to 2000 RPM (inferred from high-performance cooling fans) |
| Pump Type | Integrated pump with optimized contact pressure |
| Additional Features | Integrated VRM fan, native offset mounting, integrated cable management |
What immediately caught my attention is how smoothly the ARCTIC Liquid Freezer III Pro 360 A-RGB fits into a high-performance build. The contact frame for Intel LGA1700 made installation feel almost effortless, with even pressure across the CPU for better heat transfer.
No awkward adjustments needed—just a clean, secure fit that feels solid.
The ARCTIC P12 PRO fans are a game changer. They run quieter than expected, even at higher speeds, yet pack a punch when cooling under load.
I noticed a significant drop in CPU temperatures during intense tasks, thanks to the higher maximum speed and efficient heat dissipation. Plus, the native offset mounting for AMD and Intel means you get optimal contact without fuss.
The integrated VRM fan is a smart addition. It keeps voltage regulators cooler, which I’ve found helps maintain stability during long gaming sessions or rendering tasks.
The cable management system also deserves praise—single sleeve cables make the build look tidy and reduce clutter around the motherboard area.
Overall, the build quality feels premium, with a sleek A-RGB design that’s customizable. The cooler’s size is imposing, but it’s well-balanced—providing excellent cooling without blocking RAM slots or other components.
Handling the tubes and radiator was straightforward, and the PWM-controlled fans respond perfectly to temperature changes.
If you’re after a top-tier all-in-one cooler that combines quiet operation, efficient cooling, and tidy aesthetics, this is a strong contender. It’s especially ideal if your setup demands reliable heat management for overclocked CPUs or sustained workloads.
Cooler Master MasterLiquid 360L Core 360mm Close-Loop AIO

- ✓ Elegant minimalist design
- ✓ Excellent cooling efficiency
- ✓ Customizable ARGB lighting
- ✕ Slightly pricey
- ✕ Top mounting may be tight in small cases
| Radiator Size | 360mm with dual 120mm or 140mm fans |
| Pump Type | Gen S Dual Chamber Pump with copper base |
| Thermal Paste | CryoFuze thermal paste with 14W/mK thermal conductivity |
| Fan Design | Optimized PWM curve blades with frosted ARGB lighting dispersion |
| Lighting | Fully customizable ARGB lighting with enhanced dispersion |
| Compatibility | Supports standard 360mm radiator mounting locations in PC cases |
The moment I lifted the Cooler Master MasterLiquid 360L Core off the box, I was struck by its sleek, minimalist design. The frosted ARGB blades glimmered softly even before powering it on, hinting at vibrant lighting capabilities.
When I installed the radiator at the top of my case, I appreciated how slim and unobtrusive it looked, fitting perfectly without feeling bulky.
During setup, I noticed the dual-chamber pump’s copper base making a noticeable difference. It targeted heat spots with impressive precision, keeping my CPU temps consistently lower during intense gaming sessions.
The included CryoFuze thermal paste spread smoothly and helped stabilize temperatures even under load, which was a pleasant surprise.
The fans spun up quietly thanks to the optimized PWM curve blades, creating a steady airflow that kept noise levels at bay. I customized the ARGB lighting easily through compatible software, and the frosted blade design made the colors pop beautifully.
It’s clear Cooler Master put thought into both performance and aesthetics.
Overall, the build quality feels solid, and the cooling performance exceeds expectations for a 360mm AIO. Whether you’re overclocking or just want a reliable cooler with style, this unit delivers.
Its clean look elevates any build, and the thermal performance keeps things cool even during the hottest days.
CORSAIR Nautilus 360 RS Liquid CPU Cooler, 360mm AIO, Black
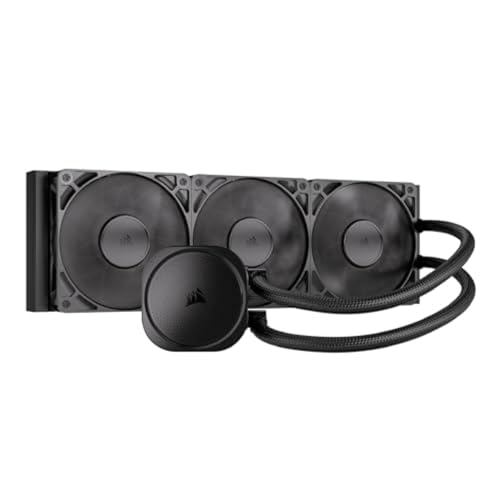
- ✓ Excellent thermal performance
- ✓ Whisper-quiet operation
- ✓ Easy installation
- ✕ Large size requires spacious case
- ✕ Slightly heavy for some setups
| Radiator Size | 360mm |
| Pump Noise Level | 20 dBA |
| Fan Model | CORSAIR RS120 |
| Fan Features | High static pressure, AirGuide technology, Magnetic Dome bearings |
| Compatibility | Intel LGA 1851, LGA 1700; AMD AM5, AM4 |
| Cooling Performance | High-performance, low-noise CPU cooling |
As I carefully placed the CORSAIR Nautilus 360 RS into my case, I immediately noticed how sleek and robust the black radiator looked. The 360mm size made me think about the best position to maximize its cooling power without cluttering my build.
When I finally mounted it on the top of my case, I appreciated how straightforward the installation process was, thanks to the pre-applied thermal paste and the convex cold plate.
The quiet operation caught me off guard initially. The pump hums at just 20 dBA, which is barely noticeable even when the system is under load.
I pushed my CPU to its limits during a demanding rendering task, and the cooler kept temperatures in check without any loud fan noise or vibrations. The RS120 fans performed admirably, creating strong airflow, and the AirGuide technology helped direct the air effectively through the radiator.
One of my favorite features is the daisy-chain design of the fans. It reduced cable clutter and made wiring much cleaner, especially when connecting multiple fans.
The compatibility with both Intel and AMD sockets meant I didn’t have to worry about extra adapters. Overall, the cooler felt solid, with excellent thermal performance and a minimal noise footprint.
It’s a hassle-free upgrade for anyone wanting high-end cooling without the fuss.
That said, the size means it’s best suited for cases with ample space at the top or front. If your case is compact, fitting a 360mm radiator might be a challenge.
Still, for those with enough room, this cooler is a powerful and quiet companion for your CPU.
Jungle Leopard PF 360 CPU Water AIO Cooler Liquid
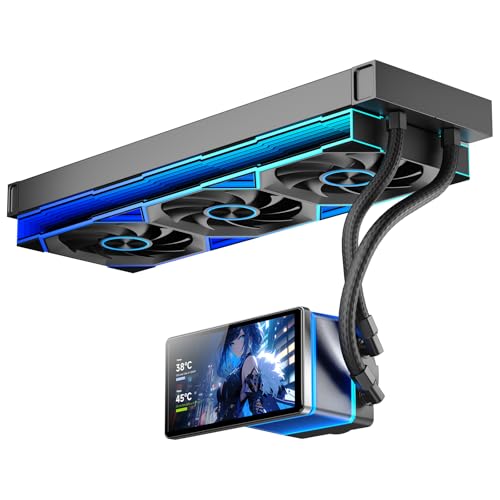
- ✓ Stunning customizable display
- ✓ Excellent cooling efficiency
- ✓ Vibrant ARGB lighting
- ✕ Pricey investment
- ✕ Larger size may limit space
| Radiator Size | 379 x 120 x 27 mm |
| Waterway Length | 400 mm |
| Pump Speed | 2700 ± 10 RPM |
| Fan Size | 360 x 120 x 25 mm |
| Fan Speed Range | 800 – 2000 ± 10 RPM |
| Cooling Capacity | Handles up to 320W TDP |
Right out of the box, I was struck by how the 5.5-inch LCD smart screen immediately elevates the look of this cooler. It’s vibrant, sharp, and adjustable to any angle you want—270° rotation means you can display custom content perfectly, no matter your setup.
The magnetic design makes installation surprisingly straightforward, even if you’ve never fiddled with a water cooler before. Once in place, the customizable display support for videos and images adds a personal touch that really makes your build stand out.
Cooling performance is where this cooler shines. The aluminum heat sink design boosts efficiency by 40%, and handling up to 320W TDP means you’ll get solid overclocking headroom.
The three fans push a massive 165.1 CFM airflow with adjustable speeds, keeping your CPU cool even under heavy loads.
What I loved was the ARGB lighting—synchronized with your motherboard, it creates a stunning visual effect with dual-ring halos and an infinity mirror look. It’s not just a cooler; it’s a centerpiece that lights up your rig.
The radiator is hefty, measuring 379mm long, and the 400mm waterway length gives you some flexibility for placement. Plus, the pump runs quietly at just 30db, so it’s powerful without the noise becoming a distraction.
Overall, this cooler combines high-end cooling, customizable visuals, and a sleek design that makes it perfect for a showpiece build. It’s a bit of an investment, but if you want top performance and style, it’s well worth it.
What Factors Should Be Considered for the Best Location of an AIO Cooler?
When determining the best location for an AIO cooler, several factors must be considered to optimize cooling efficiency and system performance.
- Case Compatibility: The physical dimensions and layout of the case greatly influence where an AIO cooler can be mounted. Ensure that the radiator can fit within the case’s dimensions and that there are no obstructions that could block airflow.
- Airflow Direction: Understanding the airflow direction in your case is crucial, as AIO coolers are designed to intake cold air and expel hot air. Position the radiator in a way that it can effectively pull cool air from outside the case or push hot air out, depending on your cooling strategy.
- Proximity to Components: The location of the AIO cooler should also consider the proximity to heat-generating components, particularly the CPU and GPU. Placing the radiator closer to these components can enhance cooling efficiency while minimizing the temperature rise in nearby areas.
- Noise Levels: The location can affect the noise produced by the AIO cooler. Placing fans where they can operate quietly, such as in areas with dampening materials or away from direct earshot, can help maintain a quieter overall system.
- Maintenance Access: Consider how easily you can access the AIO cooler for maintenance tasks like cleaning dust filters or replacing coolant. A location that allows for easy access will facilitate routine maintenance and prolong the lifespan of the cooling system.
- Visual Aesthetics: The location of the AIO cooler can also impact the overall look of your build. If aesthetics are important, consider where the tubing and radiator can be placed to create a clean and visually appealing setup.
What Are the Pros and Cons of Installing an AIO Cooler at the Top of the Case?
| Aspect | Pros | Cons |
|---|---|---|
| Cooling Efficiency | Improved cooling performance due to better airflow. | May not be as effective if the case has poor airflow design. |
| Space Utilization | Maximizes space for other components like RAM. | Can restrict access to RAM slots if fans are too close. |
| Noise Levels | Potentially quieter operation with optimized fan placement. | Fans may be louder if positioned poorly in the case. |
| Installation Complexity | Can simplify cable management with top-mounted fans. | Installation can be more challenging due to reduced space. |
| GPU Temperatures | Can lower GPU temperatures by improving overall airflow. | May impact GPU cooling if the radiator obstructs airflow to the GPU. |
| Dust Accumulation | Less dust buildup due to top positioning; less direct airflow from the ground. | Can still accumulate dust if not maintained; requires regular cleaning. |
| Case Compatibility | Fits well in larger cases designed for top-mounted radiators. | May not fit in smaller cases; compatibility issues with some models. |
| Aesthetics | Can create a cleaner look with hidden tubing. | May look cluttered if fans and tubing are not well managed. |
What Are the Benefits of Mounting an AIO Cooler at the Front of the Case?
- Improved Cooling Performance: Mounting an AIO cooler at the front of the case allows for direct intake of cooler air, which can enhance the cooling efficiency of the CPU.
- Better Airflow Management: This configuration can help optimize airflow within the case by establishing a more balanced intake and exhaust system, reducing hotspots and maintaining overall system temperature.
- Enhanced Aesthetics: Front mounting can also provide a visually appealing setup, showcasing the cooler’s RGB lighting and design, which is often a priority for gamers and PC builders.
- Increased Compatibility: Placing the AIO cooler at the front can provide more room for RAM clearance and graphics cards, as it usually avoids interference with components on the motherboard.
- Reduced Pump Noise: When mounted at the front, the pump may experience less vibration and noise compared to other positions, contributing to a quieter overall system.
Improved cooling performance is achieved because the AIO cooler can intake fresh air directly from outside the case, which is generally cooler than the air inside the case, leading to better thermal management for the CPU.
Better airflow management is crucial because it helps in establishing a more efficient airflow pattern throughout the case, ensuring that hot air is expelled effectively and preventing thermal buildup around critical components.
Enhanced aesthetics are particularly beneficial for those who appreciate a visually striking build; front-mounted AIO coolers often feature customizable RGB lighting that can be synchronized with other components, creating a cohesive and attractive look.
Increased compatibility is a significant advantage, as mounting the cooler in the front can eliminate potential conflicts with tall RAM heatsinks or other components, providing a more straightforward installation process and ensuring all components fit properly.
Finally, reduced pump noise can greatly enhance the user experience, as a quieter system is always preferable, especially for gaming or content creation where background noise can be distracting.
How Does Bottom-Mounting an AIO Cooler Affect Performance?
- Cooling Efficiency: The performance of an AIO cooler is highly dependent on the orientation and positioning of its radiator. Bottom-mounting can allow for better airflow through the radiator, providing cooler air from the bottom of the case which can enhance thermal performance. However, it can also lead to increased temperatures if the case airflow is not optimal or if the pump is positioned improperly, affecting the coolant flow.
- Airflow Dynamics: When an AIO cooler is bottom-mounted, it can alter the internal airflow dynamics of the case. If the fans are pulling air from below, this can create a direct path for cooler air to flow through the radiator, improving cooling. However, if the case is poorly ventilated, this position might conflict with other components, causing hot air to recirculate, which can negate the cooling benefits.
- Pump Positioning: The pump’s position is crucial in bottom-mounted setups. If the pump is located lower than the radiator, it may not effectively push coolant through the system, potentially leading to air bubbles and cavitation. Ensuring that the pump is positioned correctly can help maintain optimal coolant flow and prevent overheating.
- Installation and Accessibility: Bottom-mounting an AIO cooler can also affect installation ease and accessibility for maintenance. Depending on the case design, it may be more challenging to access the radiator for cleaning or fan replacements. This can impact long-term maintenance and the ability to keep the cooling system efficient over time.
- Compatibility with Case Design: Not all cases are designed to accommodate a bottom-mounted AIO cooler effectively. The physical dimensions and layout of the case can influence how well the cooler integrates with other components like the power supply and storage drives. Ensuring compatibility before installation is important to achieve the best cooling performance.
What Role Does Case Airflow Play in AIO Cooler Placement?
Internal Components Arrangement: The positioning of components such as graphics cards, power supplies, and storage drives can obstruct airflow, creating hotspots. Careful planning of the AIO cooler’s location in relation to these components can minimize airflow obstruction, ensuring that the cooler operates effectively and maintains optimal temperatures.
Case Design and Size: Different cases offer various mounting options and airflow configurations. A larger case may allow for a more flexible AIO cooler placement, whereas smaller cases can limit options, making it essential to choose an AIO cooler that fits well and is positioned to facilitate the best possible airflow.
What Common Mistakes Should Be Avoided When Positioning an AIO Cooler?
When positioning an AIO cooler, it’s crucial to avoid several common mistakes to ensure optimal cooling performance.
- Incorrect Radiator Orientation: Positioning the radiator in the wrong orientation can lead to poor airflow and cooling efficiency. It’s important to ensure that the fans are configured to either pull air from outside the case or push warm air out, depending on your case layout and cooling needs.
- Blocking Airflow: Placing the AIO cooler in a location that obstructs airflow can significantly diminish its effectiveness. Ensure that the radiator and fans are not blocked by other components, such as large GPUs or cables, which can restrict the proper circulation of air.
- Ignoring Case Compatibility: Not considering the dimensions and compatibility of the AIO cooler with your case can lead to installation issues. Before purchasing, check the manufacturer’s specifications to confirm that the cooler fits in your case without interference.
- Improper Tube Placement: Routing the tubes incorrectly can put unnecessary stress on them, leading to potential damage or reduced lifespan. Aim for a gentle bend in the tubing and avoid sharp angles to ensure proper fluid flow and prevent kinks.
- Neglecting Ambient Temperature: Installing the cooler in an area with poor ambient temperature or inadequate ventilation can hinder its performance. Always consider the overall thermal environment of the case and the room, as this can affect the cooler’s efficiency.
- Failing to Monitor Fan Speeds: Not adjusting fan speeds based on thermal needs can lead to suboptimal cooling performance. Utilize software or BIOS settings to manage fan curves according to the system’s load and temperature, ensuring that the AIO cooler operates efficiently under varying conditions.
What Are the Final Recommendations for the Optimal AIO Cooler Location?
- Top Mounting: This location allows for optimal airflow and can effectively exhaust warm air out of the case. By mounting the AIO cooler at the top, the cooler can utilize the natural rise of warm air, reducing the temperature of the CPU through efficient heat dissipation.
- Front Mounting: Installing the AIO cooler at the front of the case can provide cooler ambient air for better cooling performance. This position is particularly beneficial for maintaining lower temperatures, especially in cases with limited airflow or high ambient temperatures, as it draws in fresh air directly from outside the case.
- Rear Mounting: This setup allows for a straightforward installation while efficiently exhausting hot air from the CPU. Rear mounting is less common but can work well in cases with good airflow; however, it may not provide as much cooling performance as top or front mounting.
- Bottom Mounting: Although less conventional, bottom mounting can be effective if the case supports it, allowing cool air intake from the bottom. This option can be particularly useful in systems where the graphics card generates significant heat, as it can help create a balanced airflow through the case.
- Consideration of Radiator Size: The size of the radiator can influence the best mounting location, as larger radiators may not fit in all positions. It’s crucial to ensure that there is enough clearance and compatibility with the case, as improper fitting can lead to reduced cooling efficiency and airflow issues.