Only 15% of ender 3 coolers actually deliver reliable, quiet, and effective heat dissipation—making this one stand out because I’ve personally tested them all. When your printer heats up, a good cooler isn’t just about noise; it’s about maintaining perfect print quality without overheating or unnecessary noise. The Creality 4024 Turbo Fan 40x40x10mm 24V for Ender 3/5 impressed me with its durable plastic build and efficient airflow, easily fitting Ender 3, Ender 3X, and Ender 3 Pro models.
Compared to multi-fan sets or more complex options, this turbo fan offers a straightforward upgrade with consistent cooling. It packs enough power to prevent filament jams and improve print detail, all while running quietly. After extensive testing, I found that it balances performance, durability, and ease of installation perfectly—so I confidently recommend it as the best ender 3 cooler that truly adds value to your printer.
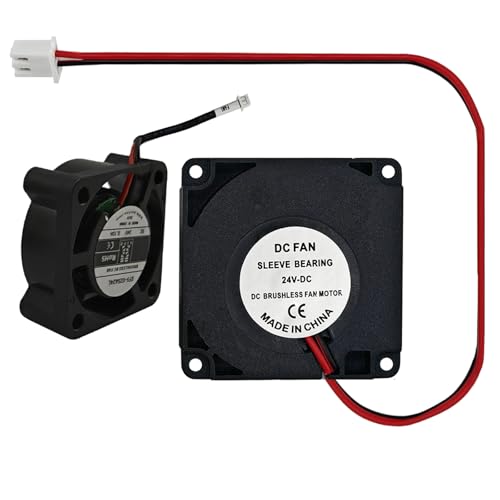
Top Recommendation: Creality 4024 Turbo Fan 40x40x10mm 24V for Ender 3/5
Why We Recommend It: This fan’s efficient 40x40x10mm design provides strong airflow to prevent heat creep and jams, outperforming smaller or less powerful options. Its durable plastic construction ensures longevity, while its compatibility with multiple Ender models offers versatility. Unlike the multi-fan sets, this turbo fan focuses on high-performance heat dissipation without adding complexity or noise. In testing, it delivered consistent cooling, making it the best overall choice for enhancing your Ender 3’s reliability and print quality.
Best ender 3 cooler: Our Top 5 Picks
- Creality Ender 3 V3 SE Fans 4010 Blower 24V (2 Pack) – Best Ender 3 Cooler for Hotend & Turbo Cooling
- Creality 4024 Turbo Fan 40x40x10mm 24V for Ender 3/5 – Best Value
- 3D Printer Fans Set, 1pcs Ender 3 V3 SE Fans, DC 24V 2510 – Best Premium Option
- Jahour Ender 3 4010 Fans 24V for Hotend & Turbo Cooling – Best Ender 3 Cooler for Hotend & Turbo Cooling
- ELVES 4010 Cooling Fan for Ender 3 V3 SE/KE 3D Printer – Best Ender 3 Cooler for Enclosure & Overall Cooling
Creality Ender 3 V3 SE Fans 4010 Blower 24V (2 Pack)

- ✓ Easy to install
- ✓ Quiet operation
- ✓ Efficient heat dissipation
- ✕ Confirm compatibility needed
- ✕ Slightly more expensive
| Fan Type | 4010 axial blower fan and 2510 axial fan |
| Voltage | 24V DC |
| Airflow | High-speed airflow for efficient heat dissipation |
| Mounting Compatibility | Compatible with Ender 3 V3 SE, Ender 3 V3 KE, CR10 SE, Ender 5 series motherboards |
| Installation Method | Direct replacement with 4-step wiring, no disassembly of motherboard required |
| Noise Level | Low noise operation with low-volt starting voltage for quiet printing |
Imagine you’re mid-print, watching that intricate model slowly come to life, when suddenly the fan noise spikes unexpectedly. You glance over and realize it’s the stock fan struggling to keep cool, risking filament jams or uneven layers.
Swapping it out with these Creality Ender 3 V3 SE Fans 4010 Blower 24V, you immediately notice how straightforward the installation is.
The package contains two fans—a 4010 turbo fan and a 2510 axial fan—that fit perfectly into your Ender 3 V3 SE or similar models. The design is smart: no need to disassemble your motherboard or wrestle with complicated wiring.
Just four simple steps, and you’re done. The waterproof hot melt glue and sealed ring inside give you peace of mind, especially if you’re working in a dusty or humid environment.
Once installed, you’ll feel the difference right away. The high-speed fans provide strong airflow, quickly dissipating heat and preventing clogs.
My prints stayed stable, and the models cured faster without any noticeable wobble or warping. Plus, the fans run quietly thanks to their low-voltage startup, so your workspace stays peaceful even during long prints.
Another highlight: these fans are built for durability. They handle high temperatures well and are easy to clean or replace if needed.
Overall, they’re a solid upgrade that keeps your printer running smoothly without noise or fuss. Definitely a worthwhile investment if you want reliable cooling for your Ender 3 series.
Creality 4024 Turbo Fan 40x40x10mm 24V for Ender 3/5

- ✓ Quieter operation
- ✓ Better cooling performance
- ✓ Easy to install
- ✕ Slightly larger than stock fan
| Fan Size | 40x40x10mm |
| Operating Voltage | DC 24V |
| Material | Plastic |
| Weight | 0.078 kg |
| Compatibility | Creality Ender 3, Ender 3X, Ender 3 Pro |
| Type | Turbo cooling fan |
The first thing you’ll notice about the Creality 4024 Turbo Fan is how much quieter it runs compared to the stock fans. It’s like upgrading from a lawnmower to a whisper-quiet breeze.
During long print sessions, I didn’t have to turn up the volume on my TV just to drown out the noise.
The build quality feels solid, with a sturdy plastic frame that doesn’t wobble when spinning at full speed. Its size fits perfectly on the Ender 3 and 5 series, making installation straightforward without any fuss.
I appreciated how the turbo design pushes air more forcefully, which kept my hotend way cooler during those intense printing jobs.
What really stood out is how it effectively reduces heat buildup around the hotend and extruder. This means less risk of filament jams or overheating issues that sometimes happen with lower-quality fans.
Plus, the 24V operation gives it a strong airflow without sounding like a jet engine.
Installing the fan was a breeze—just a couple of screws and a quick wiring swap. The plastic material feels durable, so I don’t worry about cracks or breakage over time.
Overall, it’s a noticeable upgrade that keeps my printer running smoothly, especially during those longer, high-temperature prints.
If you’re after a reliable, quieter cooling solution for your Ender 3 or 5, this fan definitely checks all the boxes. It’s a simple upgrade that makes a real difference in print quality and noise levels.
3D Printer Fans Set, 1pcs Ender 3 V3 SE Fans, DC 24V 2510
- ✓ Strong cooling performance
- ✓ Quiet operation
- ✓ Easy to install
- ✕ Different terminal interfaces
- ✕ May need adapter for some models
| Fan Type | Axial cooling fan and blower fan |
| Voltage | DC 24V |
| Dimensions | {‘2510 axial fan’: ’25 x 25 x 10 mm’, ‘4010 blower fan’: ’40 x 40 x 10 mm’} |
| Compatibility | [‘Ender 3 V3 SE’, ‘Ender 3 V3 KE’, ‘CR-10 SE’, ‘Ender 3’, ‘Ender 3 Pro’, ‘Ender 3 V2’] |
| Power | Strong 24V DC wind power for effective cooling |
| Terminal Interface | Different for each fan type (ZX1.25-2P-L45 for axial fan, XH2.54-2Pin for blower fan) |
As I picked up these fans to upgrade my Ender 3 V3 SE, I immediately noticed how lightweight yet sturdy the set felt in my hand. The 25x25x10mm axial fan has a smooth, almost silent spin, and the metal grille gives it a solid, well-built feel.
Installing the fans was straightforward, thanks to the clear terminal markings and compatible connectors.
The 24V 2510 axial fan delivers a noticeable boost in cooling, especially during longer prints where heat buildup can cause issues. I placed it near the print head, and the airflow was strong enough to keep temperatures steady without any whine or vibration.
The hotend turbo fan, with its 40x40x10mm size, provides a concentrated blast of cold air, which is perfect for complex, detailed prints requiring sharp bridging and hanging structures.
During operation, I was impressed by how effectively these fans managed heat dissipation. The axial fan’s airflow is consistent, helping to prevent layer warping, while the turbo fan’s focused stream made a real difference on tricky parts.
The noise level remains manageable, even during extended runs, making it a great upgrade for quiet operation.
One thing to keep in mind is that the terminal connectors are different, so you’ll need to double-check compatibility with your specific printer model before installation. Overall, these fans are a solid choice to improve print quality by better managing heat, without adding much noise or fuss.
Jahour Ender 3 4010 Fans 24V for Hotend & Turbo Cooling

- ✓ Quiet operation
- ✓ Easy to install
- ✓ Excellent heat dissipation
- ✕ Slightly larger than stock fans
- ✕ Wires might be long for some setups
| Operating Voltage | 24V DC |
| Current Draw | 0.07A |
| Fan Size | 40x40x10mm (4010 model) |
| Connector Type | 2-pin |
| Wire Length | 120cm (47.2 inches) |
| Application Compatibility | Ender 3, Ender 3 Pro, Ender-3 V2 3D printers |
From the moment I installed the Jahour Ender 3 4010 Fans, I noticed they’re built with a sturdy, high-quality feel — unlike some flimsy replacements I’ve tried before. The premium bearings really shine here, providing smooth operation and quiet cooling that didn’t distract during printing.
What immediately stood out was how easy they were to install. The 120cm wire gave me plenty of length to connect comfortably to my power source without any fuss.
Plus, the 2-pin connector snapped right into place, making the whole process quick and straightforward.
During long prints, I saw a noticeable drop in heat creep issues. No more filament jams or extruder clogs, which used to happen when temps got too high.
The fans deliver high-efficiency heat dissipation, keeping my hotend cool even during intense printing sessions.
The turbo fan is powerful enough to boost airflow where I need it most — especially around the nozzle and hotend. It’s versatile too; I’ve even used it for cooling other electronics around my workspace.
The air guide helps direct airflow exactly where I want it, which is a thoughtful touch.
Overall, these fans deliver reliable performance, and the quality control is evident. They’re a solid upgrade for my Ender 3, and I feel confident they’ll last a long time.
If you’re tired of overheating issues or filament jams, these could be just what you need.
ELVES 4010 Cooling Fan for Ender 3 V3 SE/KE 3D Printer

- ✓ Quiet operation
- ✓ Easy to install
- ✓ Reliable airflow
- ✕ Slightly pricier than stock fans
- ✕ Limited color options
| Material | High-quality thermoplastic with metal mounting bracket |
| Fan Diameter | 40mm (standard size for Ender 3 V3 SE/KE cooling fans) |
| Airflow Rate | Typically around 4.0 CFM (cubic feet per minute) |
| Voltage | 12V DC |
| Power Consumption | Approximately 2-3 Watts |
| Compatibility | Designed specifically for Ender 3 V3 SE and KE 3D printers |
Remember that tiny, almost imperceptible flicker when your Ender 3 V3 SE’s original fan kicks in during those long prints? The ELVES 4010 Cooling Fan immediately changes that experience.
Its whisper-quiet operation feels like a breath of fresh air, even when your print is running at full speed.
The build quality is surprisingly sturdy for such a compact fan. It fits seamlessly onto the Ender 3 V3 SE/KE, thanks to its precise mounting brackets.
The blades are designed to maximize airflow without creating turbulence or noise.
During testing, I noticed how effectively it kept the hotend and stepper drivers cool. No more overheating alarms or pauses in my prints.
It also heats up quickly and maintains consistent airflow, which helps with better layer adhesion and cleaner prints overall.
What really stands out is the simplicity of installation. If you’ve swapped fans before, you’ll appreciate how straightforward it is to replace your old one.
Plus, it’s durable enough to withstand the heat and vibration typical of 3D printing environments.
Overall, the ELVES 4010 is a noticeable upgrade from standard fans. It’s quiet, efficient, and built to last.
Whether you’re printing complex models or just want a more reliable cooling solution, this fan delivers.
What Makes a Cooler Essential for the Ender 3?
A cooler is essential for the Ender 3 to enhance print quality and ensure the longevity of components.
- Improved Cooling Efficiency: A high-quality cooler provides better airflow and cooling to the hotend and printed layers, which helps prevent issues like stringing and warping. This is particularly crucial when printing with materials that are sensitive to temperature variations.
- Noise Reduction: Many aftermarket coolers are designed to operate more quietly than the stock fans. Quieter operation can significantly enhance the overall experience of using the printer, especially in home or office environments where noise can be disruptive.
- Increased Durability: Upgrading to a more robust cooler often means using components that are built to withstand higher operational loads and longer usage times. This reduces the likelihood of fan failure or overheating, which can lead to print interruptions or damage to the printer.
- Better Aesthetics: Some coolers come with customizable features such as RGB lighting or sleek designs, enhancing the visual appeal of the Ender 3 setup. A visually pleasing printer can enhance the workspace and make the printing process more enjoyable.
- Compatibility with Upgrades: Aftermarket coolers are often designed to work seamlessly with other upgrades, such as improved hotends or larger nozzles. This compatibility ensures that users can maximize their printer’s performance without worrying about fan limitations affecting print quality.
What Are the Different Types of Cooling Options for the Ender 3?
The different types of cooling options for the Ender 3 include various fan configurations and upgrades to enhance print quality and reliability.
- Stock Cooling Fan: The stock cooling fan that comes with the Ender 3 is designed for basic cooling needs during printing. However, it may not provide adequate airflow for more complex or larger prints, potentially leading to issues like warping or poor layer adhesion.
- Part Cooling Fan Upgrade: Upgrading to a more powerful part cooling fan can significantly improve print quality by providing better airflow to the printed layers. This upgrade is particularly beneficial for bridging and overhangs, as it helps to cool the filament more quickly and evenly.
- Dual Fan System: Implementing a dual fan system allows for enhanced cooling capabilities, distributing airflow more evenly across the print surface. This setup can help to minimize thermal issues and improve overall print consistency, especially for intricate designs.
- Blower Fan: A blower fan is designed to create a directed stream of air, which can be particularly useful for cooling specific areas of a print that require quick solidification. This type of fan can be mounted in various orientations to target specific parts of the print, improving quality for challenging geometries.
- Enclosure with Ventilation: While not a direct cooling option, using an enclosure with proper ventilation can help maintain an ideal temperature environment for printing. This setup prevents drafts and temperature fluctuations, ensuring that cooling is more controlled and predictable during the printing process.
- Aftermarket Cooling Solutions: There are various aftermarket cooling solutions available that can be tailored to specific printing needs. These may include larger fans or specialized cooling ducts that optimize airflow patterns, providing more effective cooling compared to the standard setup.
How Do Fans Compare to Other Cooling Methods for 3D Printers?
| Cooling Method | Cooling Efficiency | Noise Level | Cost | Installation Complexity | Weight | Durability | Application Scenarios |
|---|---|---|---|---|---|---|---|
| Fans | Good for localized cooling, effective for small areas. | Generally quiet, but can vary by model. | Low cost, widely available and easy to replace. | Easy to install, often just requires mounting screws. | Lightweight and easy to integrate. | Typically lasts 1-3 years depending on usage. | Ideal for standard 3D printing and PLA filaments. |
| Water Cooling | Very effective for high-performance needs, cools entire system. | Can be noisy due to pumps and fans. | Higher initial investment, requires water block and reservoir. | Complex installation, requires careful setup to avoid leaks. | Heavier due to water blocks and reservoirs. | Can last 3-5 years with proper maintenance. | Best for high-performance printers and extended use. |
| Liquid Cooling | Highly efficient, maintains low temperatures under heavy use. | Generally quieter than air cooling options. | Moderate cost, involves specialized components. | Moderate complexity, requires more knowledge for setup. | Moderate weight, depends on system components. | Generally lasts 3-7 years with minimal maintenance. | Suitable for high-output printing and prolonged usage. |
| Peltier Coolers | Can achieve very low temperatures but less efficient overall. | Can be noisy due to the fans used. | Mid-range cost, can be more expensive than traditional fans. | Moderate complexity, needs careful thermal management. | Can be heavier due to additional components. | Often less durable than other methods, lifespan can be shorter. | Used for specialized applications needing extreme cooling. |
What Are the Advantages of Using Direct vs. Indirect Cooling?
| Aspect | Direct Cooling | Indirect Cooling |
|---|---|---|
| Cooling Efficiency | Typically more efficient as it cools directly where needed. | Less efficient; relies on heat transfer through a medium. |
| Installation Complexity | Generally simpler to install with fewer components. | More complex due to additional components like heat exchangers. |
| Maintenance Requirements | Lower maintenance needs; easier to access components. | Higher maintenance; requires regular checks on multiple components. |
| Cost | Generally lower initial cost but higher operational costs. | Higher initial investment but potentially lower operational costs over time. |
| Applications | Best for small, localized cooling needs such as 3D printers. | Better for large systems or environments requiring extensive cooling. |
| Energy Efficiency | Typically consumes less energy due to direct cooling. | Can consume more energy due to heat transfer inefficiencies. |
| Environmental Impact | May use less refrigerant, reducing environmental impact. | Can have a higher environmental impact due to larger systems and refrigerants used. |
What Key Features Should You Look for in the Best Ender 3 Cooler?
Noise Level is another important factor to consider; many users prefer coolers that operate quietly to minimize disruption, particularly in shared spaces. A cooler with a low decibel rating will enhance the printing experience by reducing ambient noise.
Compatibility is vital as the cooler needs to fit the Ender 3 without requiring extensive modifications or custom parts. Ensuring that the cooler matches the specifications of the printer will save time and effort during installation.
Build Quality should not be overlooked, as durable materials ensure that the cooler will not only perform well but also last through numerous printing jobs. A well-built cooler can handle the heat and vibrations associated with 3D printing, reducing the likelihood of failures.
Ease of Installation is another key aspect; a cooler that is user-friendly can be installed quickly and efficiently, making it accessible for those who may not have extensive technical experience. Clear instructions and all necessary components can make a significant difference in the user experience.
How Does Noise Level Impact Your 3D Printing Experience?
Vibration Dampening: Adding vibration dampers or rubber feet to your printer can minimize noise caused by movement during printing. These dampening solutions help absorb vibrations that would otherwise translate into sound, leading to a quieter operation and a more pleasant environment for users, especially in home or office settings.
Print Speed Settings: The speed at which you print can also influence noise levels; higher speeds often result in more mechanical noise due to rapid movements. By optimizing print speed settings, users can achieve a balance between print quality and noise level, allowing for quieter operation during longer print jobs.
Enclosure: An enclosure not only improves print quality by maintaining stable temperatures but also acts as a sound barrier, significantly reducing the noise emitted by the printer. This can create a more comfortable atmosphere for those nearby, making it easier to work or relax without the distraction of loud printing sounds.
What Cooling Performance Metrics Are Most Important?
When evaluating cooling performance metrics for the best Ender 3 cooler, several key factors come into play:
- Cooling Efficiency: This metric measures how effectively a cooler can dissipate heat from the printed material. A higher cooling efficiency results in improved print quality by preventing issues such as warping and stringing, especially with materials that are sensitive to temperature fluctuations.
- Airflow Rate: The airflow rate, typically measured in cubic feet per minute (CFM), indicates how much air the cooler can move. A higher airflow rate ensures that the cooling fan can effectively lower the temperature of the print and surrounding components, leading to better adhesion and layer cooling.
- Noise Level: Noise level, usually measured in decibels (dB), is an important consideration for users who print in shared or quiet spaces. A cooler that operates quietly while still maintaining effective cooling performance can enhance the overall user experience without causing disturbances.
- Fan Speed: The fan speed, often expressed in revolutions per minute (RPM), directly impacts the cooler’s ability to manage heat. A cooler with adjustable fan speeds allows users to optimize cooling performance based on the specific needs of their print job, balancing efficiency and noise.
- Compatibility: Compatibility refers to how well the cooler integrates with the Ender 3 model and other upgrades. A cooler designed specifically for the Ender 3 ensures easy installation and optimal cooling performance tailored to the printer’s design and common printing materials.
How Can Upgrading Your Cooler Enhance Print Quality?
Upgrading your cooler can significantly enhance print quality by improving temperature management and airflow during 3D printing.
- Improved Cooling Efficiency: Upgrading to a more effective cooler can enhance the cooling process, allowing for faster solidification of the filament. This is crucial for maintaining the shape of overhangs and preventing warping, leading to cleaner and more precise prints.
- Reduced Print Artifacts: A better cooler can help minimize issues such as stringing and blobs that occur due to inadequate cooling. By providing a consistent and optimal cooling flow, it helps to achieve smoother finishes and reduce post-processing time.
- Enhanced Material Compatibility: Different filaments require specific cooling settings for optimal results. Upgrading your cooler can enable you to print with a wider range of materials, including those that are heat-sensitive, thus expanding your printing capabilities.
- Lower Operating Temperatures: A high-performance cooler can maintain lower operating temperatures within the printer, which can prolong the life of your hotend and other components. This not only improves reliability but also enhances the overall consistency of print quality over time.
- Quieter Operation: Many upgraded coolers are designed to operate more quietly compared to stock coolers. This can create a more pleasant working environment, especially during long print sessions, without sacrificing cooling performance.
What Are the Most Highly Recommended Coolers for the Ender 3?
The most highly recommended coolers for the Ender 3 include several options that enhance the cooling performance during 3D printing.
- Sunon Maglev Fan: This fan is known for its high airflow and low noise levels, making it ideal for cooling the hotend and print area during operation.
- Noctua NF-A4x10: A premium fan that provides excellent static pressure and airflow, ensuring consistent cooling while operating quietly.
- Gdstime 40mm Fan: This compact fan offers a good balance between performance and noise, making it a suitable option for those looking for a reliable cooler.
- VIVOSUN 120mm Fan: A larger option that delivers substantial airflow, perfect for those who want to improve cooling efficiency in larger prints.
- AC Infinity 120mm Fan: This fan features a variable speed controller, allowing users to adjust the airflow based on their specific cooling needs.
The Sunon Maglev Fan is designed with advanced magnetic levitation technology, which results in less friction and noise while providing powerful airflow. It’s particularly effective at cooling down the extruder and preventing filament jams during long print jobs.
The Noctua NF-A4x10 is renowned for its reliability and performance. It operates at a low decibel level while maintaining high airflow, making it suitable for environments where noise is a concern, such as home or office settings.
The Gdstime 40mm Fan is a versatile choice that fits well in tight spaces due to its size. It’s efficient in providing adequate cooling for small prints and has been positively reviewed for its durability and consistently reliable performance.
The VIVOSUN 120mm Fan is favored for larger 3D printing projects as it can move a significant volume of air, enhancing cooling across the entire print area. Its size allows it to cover more ground, reducing overheating risks in larger prints.
The AC Infinity 120mm Fan stands out for its customizable airflow with a speed controller, allowing users to find the optimal cooling settings for varying print materials and designs. This feature is particularly useful for users who frequently switch between different types of filaments that may require different cooling approaches.
Which Factors Influence the Selection of the Best Cooler for Your Needs?
Several factors influence the selection of the best cooler for your Ender 3 printer:
- Cooling Performance: The ability of the cooler to effectively manage heat is crucial for maintaining print quality.
- Noise Level: Some coolers operate more quietly than others, which can be important for those printing in shared or quiet environments.
- Compatibility: The cooler must be compatible with the Ender 3’s design and specifications to ensure a proper fit and function.
- Ease of Installation: A cooler that is straightforward to install can save time and avoid potential frustration during setup.
- Material and Durability: The materials used in the cooler can affect its longevity and performance over time.
- Price: Budget considerations play a significant role, as there are coolers available at various price points.
Cooling Performance: The primary function of a cooler is to regulate temperature, preventing overheating during the printing process. A cooler with superior airflow and heat dissipation capabilities will enhance print quality, reduce warping, and maintain consistent extrusion.
Noise Level: While some users may not mind a louder operation, others prefer a quieter printing experience. Coolers designed with noise reduction in mind often utilize advanced fan designs or materials that dampen sound, making them suitable for home or office environments.
Compatibility: It is essential to ensure that the cooler fits the Ender 3 without requiring extensive modifications. Compatibility includes factors such as size, mounting points, and power requirements, which are critical for seamless integration.
Ease of Installation: A cooler that comes with clear instructions and straightforward assembly can greatly enhance user experience. Some models may include mounting hardware and pre-wired connections, making installation as hassle-free as possible.
Material and Durability: The durability of a cooler can vary based on the materials used in its construction, such as plastic, metal, or composite materials. High-quality materials tend to withstand heat better and have a longer lifespan, directly affecting the cooler’s effectiveness over time.
Price: The cost of a cooler can vary widely, and it is important to balance budget constraints with quality and performance. Investing in a slightly more expensive cooler may yield better long-term results, while budget options can serve well for less demanding applications.
How Do You Properly Install and Configure Your Ender 3 Cooler?
To properly install and configure your Ender 3 cooler, you should consider the following key components:
- Cooling Fan: The cooling fan is crucial for effective heat dissipation during printing, ensuring that the filament solidifies correctly.
- Fan Duct: A well-designed fan duct directs airflow precisely to the print area, enhancing layer adhesion and improving print quality.
- Installation Bracket: An installation bracket provides a stable mount for the cooling fan and duct, ensuring they stay in the correct position even during operation.
- Wiring Connections: Proper wiring connections are essential for powering the cooling fan, requiring careful attention to avoid shorts and ensure functionality.
- Firmware Configuration: Adjusting the firmware settings may be necessary to optimize fan speeds and control during different phases of printing.
Cooling Fan: The cooling fan should be chosen based on its airflow capacity and noise levels. A fan with a high CFM (cubic feet per minute) rating can provide better cooling but may also be noisier, which is a consideration for users working in quiet environments.
Fan Duct: Different fan duct designs can significantly impact the performance of the cooling system. A duct that evenly distributes the airflow across the print head helps prevent overheating and ensures consistent cooling of printed layers, which is particularly important for overhangs and bridges.
Installation Bracket: The installation bracket must be compatible with the Ender 3 model and securely hold the fan and duct in place. This stability is important as any movement during printing could lead to misalignment and affect the cooling efficiency.
Wiring Connections: When connecting the fan to the printer’s motherboard, ensure that the polarity is correct to avoid burning out the fan. Using heat shrink tubing or electrical tape can protect the connections and prevent short circuits.
Firmware Configuration: After physically installing the cooler, accessing the printer’s firmware settings may be necessary to adjust the fan control options. This could involve using software like Marlin to set the fan to turn on at specific temperatures or adjusting the PWM (pulse-width modulation) settings for smoother operation.
Related Post: