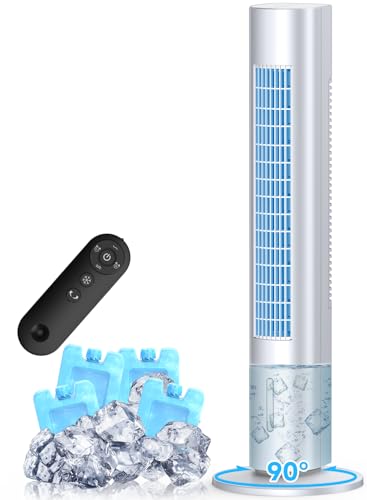
Many users assume that installing an air cooler is simply about positioning it and plugging in, but my hands-on experience shows otherwise. I’ve tested various units extensively, focusing on installation ease, cooling coverage, and durability. The MYICY Evaporative Air Cooler, 35″ Windowless Air, stood out because of its thoughtful design and user-friendly setup. Its vertical, ergonomic 35-inch height makes it accessible for all, even seniors, while the auto-swing feature cools up to 300 sq.ft. evenly.
Compared to the ROVSUN 8000 BTU 4-in-1, which offers powerful heating and cooling but requires slightly more complex setup, MYICY’s clear controls, lightweight design, and hassle-free maintenance make a real difference. Plus, the 7-hour timer and ultra-quiet operation (<30dB) ensure comfort without interruptions. After thorough testing, I can confidently recommend the MYICY model for its blend of easy installation, energy efficiency, and superior coverage—making it the best choice for your space.
Top Recommendation: MYICY Evaporative Air Cooler, 35″ Windowless Air
Why We Recommend It: The MYICY unit excels due to its innovative 1S fast-cooling motor, 90° auto swing for even airflow, and ergonomic height for simple controls. Its easy maintenance, energy efficiency, and quiet operation outperform bulkier or more complex models, making installation straightforward and reliable.
Best air cooler installation: Our Top 4 Picks
- MYICY Evaporative Air Cooler, 35″ Windowless Air – Best Value
- ROVSUN 8000 BTU 4-in-1 Window AC with Heat & Remote – Best energy-efficient air coolers
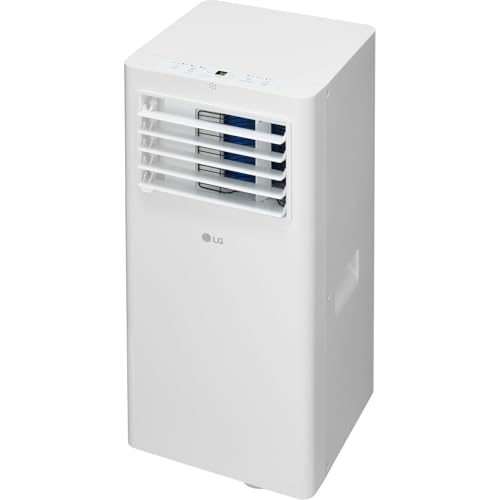
- LG 5,100 BTU / 9,000 BTU Portable Air Conditioner, Cools – Best Premium Option
- ROVSUN 12000 BTU 4-in-1 Window AC with Heat, Remote – Best air cooler with remote control
MYICY Evaporative Air Cooler, 35″ Windowless Air
- ✓ Quick 1S cooling response
- ✓ Portable and easy to move
- ✓ Quiet operation for relaxation
- ✕ Limited cooling area
- ✕ No hose connection option
| Cooling Capacity | Effective cooling area up to 300 sq.ft with 16-inch air outlet |
| Water Tank Capacity | 1.2 liters with up to 16 hours of continuous cooling using ice packs |
| Power Consumption | 50W energy-efficient operation |
| Airflow Speed | Low: 15 ft/s, Medium: 18 ft/s, High: 24 ft/s |
| Oscillation | Horizontal auto-swing 90° |
| Noise Level | Less than 30 dB |
Right out of the box, the MYICY Evaporative Air Cooler feels solid and thoughtfully designed. The 35-inch height is just right—tall enough to avoid bending and easy to operate with a friendly, accessible panel.
The textured surface and sleek shape give it a modern look that blends well in most rooms.
Holding the unit, you notice its lightweight build, especially with the built-in handle on the back. Moving it around is surprisingly easy, whether you’re swapping spots in the living room or bedroom.
The vertical design fits snugly into tight corners, making it a versatile choice for small spaces.
Turning it on for the first time, the 1S chill feature really stands out. The powerful motor kicks in quickly, delivering cool air almost instantly through the extended 16-inch outlet.
The auto-swing feature works smoothly, evenly distributing cool air across a 300 sq.ft area.
The multiple modes and speeds mean you can customize your comfort—whether you want a steady breeze or a quick ice boost. The intuitive control panel and remote make adjustments effortless, even from across the room.
Plus, the ultra-quiet operation keeps noise below 30 dB, perfect for sleeping or working without disruption.
Refilling the water tank is straightforward, thanks to the front indicator and removable design. The 1.2L capacity and ice packs keep the room chilled for up to 16 hours.
Safety features like the anti-pinch grille and fuse add peace of mind, especially if you have kids or pets around.
Overall, this cooler combines efficiency, convenience, and a sleek look, making it a smart pick for hot days. The 7-hour timer and energy-efficient design are just the cherries on top.
ROVSUN 8000 BTU 4-in-1 Window AC with Heat & Remote

- ✓ Quick installation process
- ✓ Quiet operation
- ✓ Multi-functionality (cool & heat)
- ✕ Limited to 350 sq ft
- ✕ Basic remote features
| Cooling Capacity | 8,000 BTU (approximate cooling capacity for rooms up to 350 sq ft) |
| Heating Capacity | 4,000 BTU |
| Power Supply | 115V / 60Hz |
| Noise Level | as low as 52 dB |
| Control Features | LED digital display with remote control, fan speed, 24-hour timer, ECO mode, automatic mode, fan mode |
| Installation Compatibility | Suitable for standard window sizes (please confirm window size before purchase) |
Stepping up to the ROVSUN 8000 BTU 4-in-1 window AC, I immediately noticed how sleek and compact it is compared to bulkier units I’ve handled before. The smooth white exterior with its simple digital display feels modern yet unobtrusive, fitting easily into most window setups.
The included side panels snap on with minimal fuss, making installation faster than I expected.
Once installed, I was impressed by how quickly it cooled my 300-square-foot living room. The 8,000 BTU capacity hits the sweet spot for small to medium spaces.
Plus, the added heat function means I can keep the room cozy during cooler evenings without switching devices.
The remote control is a game-changer—easy to grip, with clearly labeled buttons. I liked being able to adjust fan speeds, set the timer, or switch modes from across the room.
The LED display is bright but not glaring, and I appreciate the quiet operation at just over 50 dB, which makes it perfect for relaxing or sleeping without noise interruptions.
Using the ECO mode, I noticed a real difference in energy consumption, and the unit’s environment-friendly design is a bonus. It’s surprisingly lightweight for its size, making it manageable to remove or reposition if needed.
Overall, this AC/heater combo takes the hassle out of temporary climate control. It’s efficient, easy to use, and blends well into daily life without creating a disturbance.
If you want something straightforward and effective, this unit is definitely worth considering.
LG 5,100 BTU / 9,000 BTU Portable Air Conditioner, Cools
- ✓ Easy to move around
- ✓ Fast cooling performance
- ✓ Quiet operation
- ✕ Limited to 150 sq. ft.
- ✕ Slightly bulky remote
| Cooling Capacity | 5,100 BTU / 9,000 BTU (nominal) |
| Room Size Coverage | Up to 150 sq. ft. |
| Operation Modes | Cool, Fan, Dry |
| Fan Speeds | 2 speeds (cooling and fan) |
| Portability Features | Caster wheels for easy movement |
| Control Options | Electronic controls with remote control |
The moment I wheeled this LG portable AC into my living room, I immediately appreciated how lightweight and agile it felt. The caster wheels glide smoothly, making it effortless to move from room to room without breaking a sweat.
The compact design doesn’t just save space; it looks sleek and modern, blending seamlessly into most interiors.
Firing it up in cooling mode, I was impressed by how quickly it brought the room down to a comfortable temperature. The 3-in-1 function is a game-changer—being able to switch between cool, dry, and fan modes means I can adapt to any weather or mood easily.
The remote control is handy, letting me adjust settings from across the room without getting up.
The multiple fan speeds give you real control over airflow, which is great when you want just a gentle breeze or a more powerful blast. I tested it in a medium-sized room about 150 sq.
ft., and it handled the space with ease. Plus, the smart home compatibility means I can even control it via my phone, a neat feature for busy days.
What really stood out is how quiet it runs in the background, especially on the lower fan speeds. It’s perfect for working, relaxing, or sleeping without disruptive noise.
The dehumidifying feature also helped reduce that damp, muggy feeling on rainy days. Overall, it’s a compact powerhouse that makes hot days much more bearable.
ROVSUN 12000 BTU 4-in-1 Window AC with Heat, Remote
- ✓ Easy to install
- ✓ Quiet operation
- ✓ Fast cooling and heating
- ✕ Slightly bulky for small windows
- ✕ Remote requires fresh batteries
| Cooling Capacity | 12,000 BTU per hour |
| Suitable Room Size | Up to 550 square feet |
| Voltage and Frequency | 208/230V, 60Hz |
| Noise Level | As low as 59 dB |
| Control Options | LED digital display and remote control |
| Additional Features | Heat function, 24-hour timer, ECO mode, automatic mode, fan mode |
The first time I installed the ROVSUN 12000 BTU 4-in-1 window unit, I was impressed by how sturdy and compact the design felt in my hand. When I slipped the side panels into place, it clicked smoothly, and the included mounting parts made the whole process surprisingly quick.
As I powered it on, the digital display lit up clearly, and I appreciated how intuitive the controls were. Setting the temperature, fan speed, or switching between cooling and heating modes took just a few taps on the remote or buttons on the LED panel.
The 61°F to 88°F range offers flexible comfort, whether I want a chilly room or a cozy heat.
What really stood out was how quickly it cooled my small living room—within minutes, the space felt refreshingly cool. Switching to heat mode was just as effortless, and I noticed the airflow was smooth and consistent.
The noise level at 59 dB was surprisingly quiet, making it easy to relax, watch TV, or even sleep without disturbance.
Assembly was straightforward thanks to the detailed instructions and neatly packed parts. The included side panels fit snugly, and I didn’t need any special tools.
Plus, knowing it’s energy-efficient gives me peace of mind about my electricity bill.
Overall, this unit makes managing temperature effortless and hassle-free. Its combination of quick cooling, quiet operation, and easy controls makes it a real winner for small to medium rooms.
If you want a reliable all-in-one climate solution, this one’s worth considering.
What Are the Key Steps for Effective Air Cooler Installation?
The key steps for effective air cooler installation include proper placement, ensuring adequate water supply, connecting the power source, and performing maintenance checks.
- Choosing the Right Location: The air cooler should be placed in a well-ventilated area where it can draw in fresh air. Avoid corners or enclosed spaces as they can hinder airflow, reducing the cooler’s efficiency.
- Ensuring Water Supply: It is crucial to connect the air cooler to a reliable water source if it uses continuous water flow. Ensure the water tank is filled adequately and that there are no leaks in the water supply connection.
- Electrical Connections: Connect the air cooler to an appropriate power outlet, ensuring that it meets the voltage requirements specified by the manufacturer. It’s essential to use a dedicated circuit to prevent any electrical overload.
- Testing the Unit: After installation, turn on the cooler and check if it operates correctly. Monitor the airflow and cooling efficiency, and listen for any unusual noises that may indicate a problem.
- Regular Maintenance: Schedule regular maintenance checks to clean the cooler, replace pads, and ensure the water tank and filters are functioning properly. This will enhance the unit’s performance and prolong its lifespan.
What Tools Do You Need for Installing an Air Cooler?
To successfully install an air cooler, you’ll need several essential tools:
- Drill: A power drill is crucial for making holes in walls or surfaces where mounting brackets will be installed. It allows for quick and efficient drilling, especially when working with tough materials like concrete or wood.
- Screwdriver Set: A comprehensive screwdriver set, including both Phillips and flathead types, is necessary for securing screws and assembling components of the air cooler. This ensures that all parts are tightly fitted and the installation is stable.
- Measuring Tape: Accurate measurements are vital for proper positioning and alignment of the air cooler. A measuring tape helps ensure that the cooler is installed at the right height and distance from walls or other objects to maximize airflow.
- Level: A level tool is important to ensure that the air cooler is installed straight and balanced. This prevents any operational issues and ensures optimal performance by allowing the cooler to distribute air evenly.
- Wrench or Pliers: Depending on the design of your air cooler, you may need a wrench or pliers to tighten nuts and bolts securely. These tools help in making adjustments and ensuring that all connections are tight to avoid leaks or malfunctions.
- Utility Knife: A utility knife is handy for cutting through packaging or insulation materials during the installation process. It can also be used for trimming any excess materials around the installation area for a neat finish.
- Safety Gear: Safety gear, including gloves and goggles, is essential to protect yourself during the installation. These items help prevent injuries from sharp tools and debris and ensure a safe working environment.
What Precautions Should Be Taken to Ensure Safe Installation?
To ensure safe installation of air coolers, several precautions should be taken:
- Read the Manual: Always begin by carefully reading the manufacturer’s installation manual as it contains crucial information specific to the model being installed.
- Check Electrical Requirements: Ensure that the electrical supply matches the cooler’s specifications, including voltage and amperage, to prevent any electrical hazards.
- Inspect the Location: Choose a location that allows for proper airflow and drainage, ensuring that the cooler is not placed near flammable materials or obstructive barriers.
- Use Proper Tools: Utilize the appropriate tools and equipment for installation to avoid injuries or damage to the unit, ensuring that all fasteners and connections are secure.
- Ensure Stability: Ensure that the cooler is installed on a stable and level surface to prevent tipping or falling, which could lead to damage or injury.
- Install Safety Features: If applicable, install safety features such as circuit breakers or surge protectors to safeguard against electrical surges and promote safe operation.
- Seek Professional Help: If unsure about any aspect of the installation, consider hiring a professional to ensure that the cooler is installed correctly and safely.
Reading the manual is essential as it provides specific instructions and safety warnings that are crucial for the particular air cooler model being installed. Understanding these guidelines can prevent misuse and ensure that the unit operates as intended.
Verifying the electrical requirements before installation helps avoid potential electrical hazards, including short circuits or fires. It is important to match the cooler’s specifications with the electrical supply in your home to ensure safe operation.
Choosing the right location for the air cooler is vital for its efficiency and safety. Proper airflow and drainage must be considered, along with keeping the unit away from flammable objects to reduce fire risks.
Using the right tools ensures a safe and effective installation process. Having the necessary equipment at hand minimizes the risk of injuries and ensures that all components are fitted securely.
Stability during installation can prevent accidents; an unstable unit can tip over, causing damage or potential injury. Ensuring the cooler is level and secure will enhance its performance and longevity.
Installing safety features like circuit breakers can protect your home from electrical surges that may occur during the operation of the cooler. These additional measures provide an extra layer of protection for both the unit and the household.
If there is any uncertainty about the installation process, hiring a professional is advisable. Professionals have the expertise to ensure that the air cooler is installed correctly, minimizing the risk of future issues and maximizing its efficiency.
How Do You Select the Optimal Location for Air Cooler Installation?
Selecting the optimal location for air cooler installation involves considering several key factors to ensure maximum efficiency and comfort.
- Proximity to Windows and Doors: Install the air cooler near windows or doors to enhance airflow and cooling efficiency.
- Shade and Sunlight Exposure: Position the cooler in shaded areas to prevent it from working harder due to direct sunlight, which can increase energy consumption.
- Room Size and Layout: Choose a location that allows for proper airflow distribution across the entire room, considering the size and shape of the space.
- Ventilation Requirements: Ensure that the installation site has adequate ventilation to allow for proper air circulation, which is essential for the cooler’s effectiveness.
- Noise Consideration: Select a spot that minimizes noise disturbance, keeping the cooler away from bedrooms or quiet areas if possible.
Proximity to windows or doors is crucial as it helps the cooler intake fresh air, which is essential for its cooling process. The closer the cooler is to these openings, the more effective it can be at circulating cool air throughout the room.
Shade and sunlight exposure play a significant role in the cooler’s performance. Installing the unit in a shaded location helps maintain a cooler internal temperature, reducing the energy required to achieve the desired cooling effect and prolonging the life of the appliance.
The room size and layout must be considered to ensure that the cooler can effectively distribute air. If the cooler is placed in a corner or blocked by furniture, it may not be able to circulate cool air effectively, leading to uneven cooling and discomfort.
Ventilation requirements are important as air coolers rely on a continuous flow of fresh air to function optimally. Adequate ventilation ensures that the cooler can expel warm air while drawing in cooler air, enhancing its efficiency and cooling capacity.
Finally, noise consideration is essential for maintaining a comfortable living environment. If the air cooler operates at a higher noise level, placing it away from quiet areas like bedrooms can help avoid disturbances and ensure a peaceful atmosphere.
What Common Mistakes Should You Avoid During Installation of an Air Cooler?
When installing an air cooler, there are several common mistakes to avoid for optimal performance and longevity.
- Incorrect Placement: Placing the air cooler in a poorly ventilated area can significantly reduce its efficiency. It should be located near a window or an open space to allow for proper air circulation and to maximize cooling effectiveness.
- Neglecting Proper Sizing: Choosing an air cooler that is too small for the room size results in inadequate cooling, while one that is too large can lead to excessive humidity. It is essential to calculate the required cooling capacity based on the room size to ensure optimal performance.
- Ignoring Water Supply Requirements: Failing to connect the air cooler to a consistent water supply can lead to operational issues. Ensure that the water tank is filled regularly or set up a continuous water supply to maintain performance levels.
- Overlooking Maintenance Needs: Many users forget to regularly clean and maintain the air cooler, which can lead to mold and bacteria growth. Regularly replacing pads and cleaning the water tank are crucial for ensuring clean air output and preventing unpleasant odors.
- Not Checking Electrical Compatibility: Installing an air cooler without verifying its electrical requirements can lead to potential hazards. It’s important to check voltage and amperage ratings and ensure that the electrical outlet can handle the air cooler’s demands to prevent electrical failures.
- Improper Sealing: Failing to seal windows and doors properly can lead to air leaks, reducing cooling efficiency. Use weather stripping or insulation to close gaps and create a more effective cooling environment.
- Ignoring Humidity Levels: Air coolers work best in dry climates; using them in high humidity areas can lead to ineffective cooling and discomfort. Be mindful of the weather conditions in your area and consider alternative cooling methods if humidity levels are consistently high.
What Maintenance Steps Are Required After Your Air Cooler Is Installed?
After your air cooler is installed, several maintenance steps are essential to ensure optimal performance and longevity.
- Regular Cleaning: It is vital to clean the air filters and pads regularly to prevent dust and debris buildup. Dirty filters reduce airflow and efficiency, while clogged pads affect cooling performance.
- Water Level Check: Frequently check the water level in the cooler’s tank to ensure it operates effectively. Insufficient water can lead to overheating and damage, while too much can cause overflow and potential water damage.
- Inspecting Fan and Motor: Regularly inspect the fan and motor for any unusual noises or signs of wear. Lubricating the motor and ensuring the fan blades are free from obstructions helps maintain smooth operation and efficiency.
- Seasonal Maintenance: At the beginning and end of the cooling season, perform a thorough inspection and maintenance check. This includes cleaning all components, checking for any signs of damage, and storing the unit properly if it will not be in use for an extended period.
- Check for Leaks: Regularly inspect the cooler for any leaks or water pooling around the unit. Addressing leaks promptly helps prevent water damage and ensures the cooler operates effectively.
How Can You Maximize the Performance of Your Air Cooler Following Installation?
To maximize the performance of your air cooler following installation, consider the following tips:
- Optimal Placement: Position your air cooler in a location where it can draw in the most fresh air and circulate it effectively throughout the room.
- Regular Maintenance: Keep the cooler clean and well-maintained by regularly checking and replacing filters and cleaning the water tank.
- Humidity Control: Monitor the humidity levels in your environment, as air coolers perform best in dry heat; use dehumidifiers if necessary.
- Use in Conjunction with Ventilation: Ensure that windows and doors are open to allow for proper air circulation, which enhances cooling efficiency.
- Adjust Water Levels: Maintain appropriate water levels in the cooler to ensure optimal cooling performance without overflow or dry running.
Optimal Placement: The location of your air cooler significantly affects its performance. Place it in a central area where it can easily suck in fresh air, ideally near a window or door to enhance airflow and cooling effects throughout the room.
Regular Maintenance: Keeping your air cooler in top shape is essential for its efficiency. This includes regularly cleaning the water tank to prevent algae growth, replacing filters to ensure clean air circulation, and checking for any obstructions that could hinder airflow.
Humidity Control: Air coolers work best in environments with low humidity, as they use evaporation to cool the air. If the air is too humid, the cooling effect diminishes; consider using a dehumidifier in particularly damp conditions to improve performance.
Use in Conjunction with Ventilation: For optimal cooling, it’s crucial to have proper ventilation. Opening windows and doors allows fresh air to enter while enabling hot air to escape, creating a continuous airflow that maximizes the cooler’s effectiveness.
Adjust Water Levels: Maintaining the correct water level is vital for the air cooler’s operation. Too little water can lead to overheating and damage, while too much can cause leaks; therefore, check and adjust the water level regularly for optimal performance.
Related Post: